As the demand for our YMCA courses grows, it has become more apparent that there are ways to improve the process that we use to build those courses. Therefore, we have spent our time working on streamlining the process of creating content for them, as they are one of our largest groups of clients.
Not only is it important to do our best to provide a product we are proud of, but it’s important for the client to receive it in a timely manner! This post will dive into what we have been working on to help speed up the design process, specifically the Analyzing, Planning, and Building phases, exclusively for our YMCA clients.
OUR PROCESS
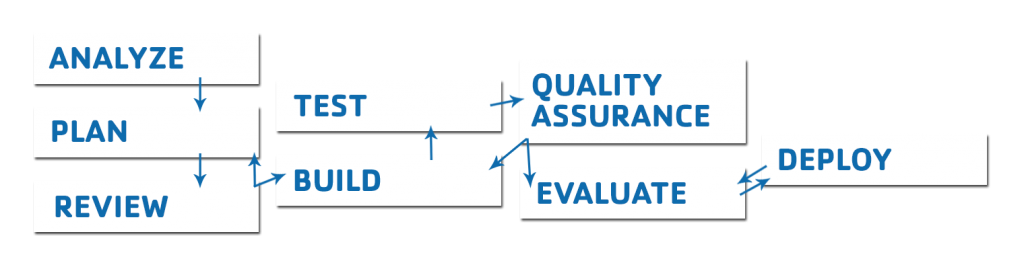
This is our design process. While it may look short, it can take weeks and sometimes months to build and implement a set of courses for a client. But, there are ways we have slowly chipped away at the total time for development.
ANALYZE & PLAN
It’s extremely important to gather the materials of a client efficiently to be able perfectly execute their vision for their course. To help them, we provide YMCAs with something we have dubbed Implementation Guides. These guides are PowerPoint™ documents of three different YMCA’s existing courses, broken down into each of the different interactions within the course. This is to easily remind new clients how the courses work, and give them a manageable way to note changes they would like completed for their own courses.

Not only do these guides help them, they help us tremendously in being able to plan ahead and determine what needs to be done, and to reach a manageable goal date for their courses to deploy. After the client finishes the Implementation Guide, we begin to create an outline of their materials. Then, we meet with them and go over the implementation guide to be sure we have everything we need to begin developing the courses for them.
BUILD
While analyzing and planning the course can take upwards of a few weeks, the largest part of developing a course is the build phase. I mentioned above that there are three different YMCA’s courses from which we have created the Implementation Guides. This boils down to the fact that there are three main existing courses from which new YMCAs will share common content.
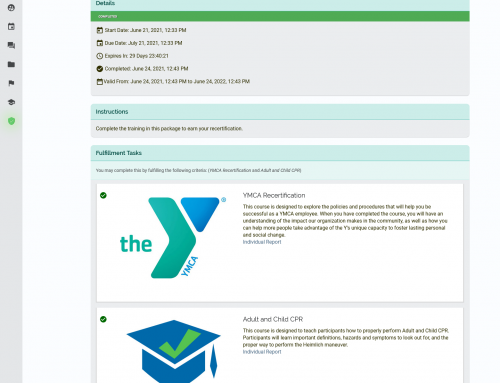
- New Employee Orientation includes information such as an overview of the Y’s branches, YMCA History, programs offered, and benefits for the employees.
- Safety and Risk Management includes information regarding OHSA regulations, important accident policies and procedures, and details about what to do in the event of being exposed to harmful chemicals or blood.
- Child Abuse and Maltreatment Prevention includes important facts about child abuse and how to recognize signs of abuse, describes specific policies at the YMCA to help you protect children and protect yourself against allegations of abuse, and outlines how to report and document abuse.
To help speed up the course building process, we have created templates out of the courses from which the Implementation Guides were based. Then we have updated those templates to facilitate easier editing.
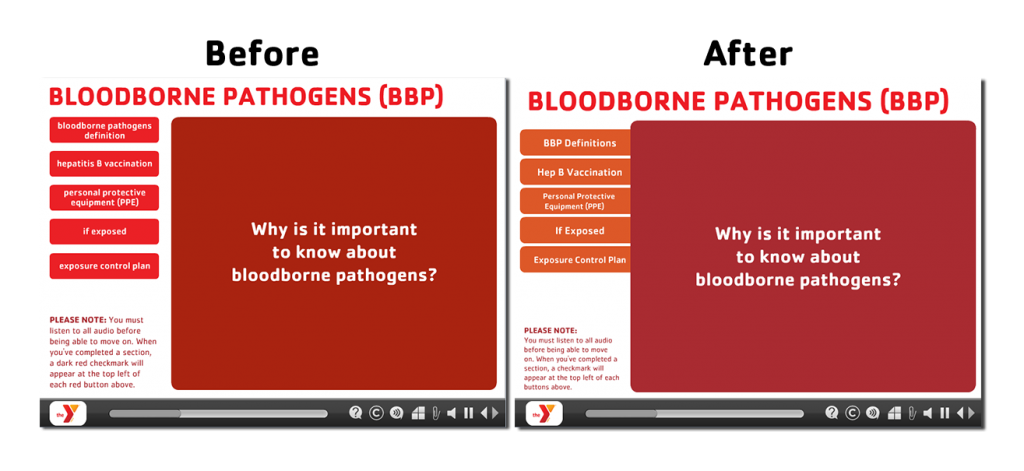
For example, above you’ll see two images of the same section of the Safety and Risk Management course. On the left is the version before the template and on the right is the newer version that has been updated. To you, there probably isn’t much of a difference between them, but there is a lot going on underneath that has not only sped up the process of replacing content, but has made it easier to for our design team to work with across the board.
The most prominent update in this example in this section is the buttons. The way our software works is that you may choose images for several different states of the button. In this case, on the left, each button has a separate image for each state; the initial state, a rollover state, and a selected state. That means just from this example there are 15 images just for the buttons! You can easily see how maintaining these images can be somewhat time consuming.
This creates a bit of a tradeoff. On one hand, we can have beautifully crafted buttons that required a lot of upkeep, and on the other hand, we have much more basic buttons that have little to no upkeep. So what do you do in this situation? We trade the personality of the buttons for a page that is easier to maintain by:
- Reducing the white space
- Attaching them to the main display
- Making the main window for content a bit larger
But, how can this example with buttons speed up our developing process by a considerable amount of time? Well the answer is that they don’t alone. It’s when we replicate this same methodology throughout the YMCA template courses that the new courses require much less time to develop.
These updates also assist another instructional designer coming into the project, who may be unfamiliar with it. Instead of having to search for files of 15 different images for buttons, for example, they have everything needed to develop that page right in front of them inside the course. When this is consistent throughout a course template, you can see how the time saved on development can add up rather quickly!
I hope you enjoyed your look into how we’ve worked on making the process of analyzing YMCA content and adopting a more streamlined course development methodology! Stay tuned, because this is only scratching the surface!